
Authentication is the process of verifying the identity of a user who is attempting to access a system, application, or online service. In this blog post, you will learn about React Native authentication, including native mobile specific login mechanisms like "Sign in with Apple" and "Google One Tap sign-in", as well as SMS & WhatsApp based authentication.
At the end of this blog post, you will have all the components needed to create the ideal authentication experience for your mobile app users.
Prerequisites
This article assumes you are comfortable with writing a basic application in React Native. No knowledge of Supabase is required.
We will use the following tools
- Expo - we used Expo SDK version 49.0.0 (React Native version 0.72)
- Supabase - create your account here if you do not have one
- IDE of your choosing
Note: We're using Expo as that's the recommended way of getting started with React Native. However, the fundamental approach here applies to bare React Native applications as well.
Set up supabase-js for React Native
Using supabase-js is the most convenient way of leveraging the full power of the Supabase stack as it conveniently combines all the different services (database, auth, realtime, storage, edge functions) together.
Install supabase-js and dependencies
After you have created your Expo project, you can install supabase-js and the required dependencies using the following command:
_10npx expo install @supabase/supabase-js @react-native-async-storage/async-storage react-native-url-polyfill
Authentication storage
By default, supabase-js uses the browser's localStorage mechanism to persist the user's session but can be extended with platform specific storage implementations. In React Native we can build native mobile and web applications with the same code base, so we need a storage implementation that works for all these platforms: react-native-async-storage.
We need to pass an instance of react-native-async-storage to supabase-js to make sure authentication works reliably across all react native platforms:
You can find your URL and anon key in the API credentials section of the Supabase dashboard.
Encrypting the user session
If you wish to encrypt the user's session information, you can use aes-js and store the encryption key in Expo SecureStore. The aes-js library is a reputable JavaScript-only implementation of the AES encryption algorithm in CTR mode. A new 256-bit encryption key is generated using the react-native-get-random-values library. This key is stored inside Expo's SecureStore, while the value is encrypted and placed inside AsyncStorage.
Please make sure that:
- You keep the
expo-secure-storage,aes-jsandreact-native-get-random-valueslibraries up-to-date. - Choose the correct
SecureStoreOptionsfor your app's needs. E.g.SecureStore.WHEN_UNLOCKEDregulates when the data can be accessed. - Carefully consider optimizations or other modifications to the above example, as those can lead to introducing subtle security vulnerabilities.
Install the necessary dependencies in the root of your Expo project:
_10npm install @supabase/supabase-js_10npm install react-native-elements @react-native-async-storage/async-storage react-native-url-polyfill_10npm install aes-js react-native-get-random-values_10npx expo install expo-secure-store
Implement a LargeSecureStore class to pass in as Auth storage for the supabase-js client:
Email and password authentication in React Native
Once we've set up the storage mechanism, building an email and password sign in flow becomes pretty straight forward. Install react-native-elements to get some nice cross platform button and input fields:
_10npm install react-native-elements
Set up a simple email form component:
Note, by default Supabase Auth requires email verification before a session is created for the users. To support email verification you need to implement deep link handling which is outlined in the next section.
While testing, you can disable email confirmation in your project's email auth provider settings.
OAuth, magic links and deep-linking
As you saw above, we specified detectSessionInUrl: false when initializing supabase-js. By default, in a web based environment, supabase-js will automatically detect OAuth and magic link redirects and create the user session.
In native mobile apps, however, OAuth callbacks require a bit more configuration and the setup of deep linking.
To link to your development build or standalone app, you need to specify a custom URL scheme for your app. You can register a scheme in your app config (app.json, app.config.js) by adding a string under the scheme key:
_10{_10 "expo": {_10 "scheme": "com.supabase"_10 }_10}
In your project's auth settings add the redirect URL, e.g. com.supabase://**.
Finally, implement the OAuth and linking handlers. See the supabase-js reference for instructions on initializing the supabase-js client in React Native.
For the best user experience, it is recommended to use universal links which require a more elaborate setup. You can find the detailed setup instructions in the Expo docs.
Native mobile login mechanisms
Some native mobile operating systems, like iOS and Android, offer a built-in identity provider for convenient user authentication.
For iOS, apps that use a third-party or social login service to set up or authenticate the user’s primary account with the app must also offer Sign in with Apple as an equivalent option.
There are several benefits and reasons why you might want to add social login to your applications:
-
Improved user experience: Users can register and log in to your application using their existing app store accounts, which can be faster and more convenient than creating a new account from scratch. This makes it easier for users to access your application, improving their overall experience.
-
Better user engagement: You can access additional data and insights about your users, such as their interests, demographics, and social connections. This can help you tailor your content and marketing efforts to better engage with your users and provide a more personalized experience.
-
Increased security: Social login can improve the security of your application by leveraging the security measures and authentication protocols of the social media platforms that your users are logging in with. This can help protect against unauthorized access and account takeovers.
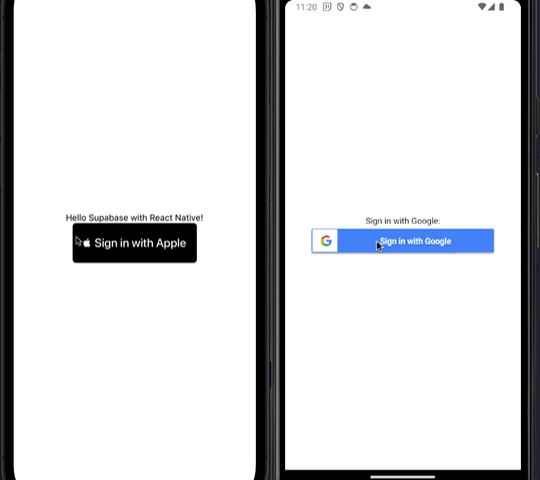
Sign in with Apple
Supabase Auth supports using Sign in with Apple on the web and in native apps for iOS, macOS, watchOS, or tvOS.
For detailed setup and implementation instructions please refer to the docs and the video tutorial.
Sign in with Google
Supabase Auth supports Sign in with Google on the web, native Android applications, and Chrome extensions.
For detailed set up and implementation instructions please refer to the docs and the video tutorial.
One time passwords
Supabase supports various forms of passwordless authentication:
- Email Magic Link
- Email one-time password (OTP)
- SMS & WhatsApp one-time password (OTP) (watch the video tutorial)
Passwordless login mechanisms have similar benefits as the native mobile login options mentioned above.
Conclusion
In this post, we learned various authentication mechanisms we can use in React Native applications to provide a delightful experience for our users across native mobile and web.