Flutter is Google’s open-source framework to develop cross-platform applications. In this article, we will take a look at how we can implement authentication using Google sign-in to secure our application using the Supabase SDK for Flutter.
We will also dive into the deep ends of Open ID Connect sign-in to better understand how third-party sign-ins are being performed. You can check out the code of the sample in this article here.
Prerequisites
This article assumes you are comfortable with writing a basic application in Flutter. No knowledge of Supabase is required.
We will use the following tools
- Flutter - we used v3.10.5 for this article
- Supabase - create your account here if you do not have one
- IDE of your choosing
What is Open ID Connect?
We will implement third-party login with Google utilizing the Open ID Connect functionality of Supabase Auth. Open ID Connect, or OIDC is a protocol built on top of OAuth 2.0 that allows third-party applications to request the users to provide some personal information, such as name or profile image, in the form of an identity token along with an access token. This identity token can then be verified and decoded by the application to obtain that personal information.
Supabase auth provides signInWithIdToken method where we can sign in a user using their ID token obtained from third-party auth providers such as Google. Upon signing a user with the signInWithIdToken method, Supabase automatically populates the content of the ID token in the Supabase user metadata for easy access to the information. We will be utilizing this feature in this example to display the user profile upon the user signing in.
In today’s example, our app will make a request to Google, obtain the identity token, and we will use it to sign the user in as well as obtain basic user information.
What we will build
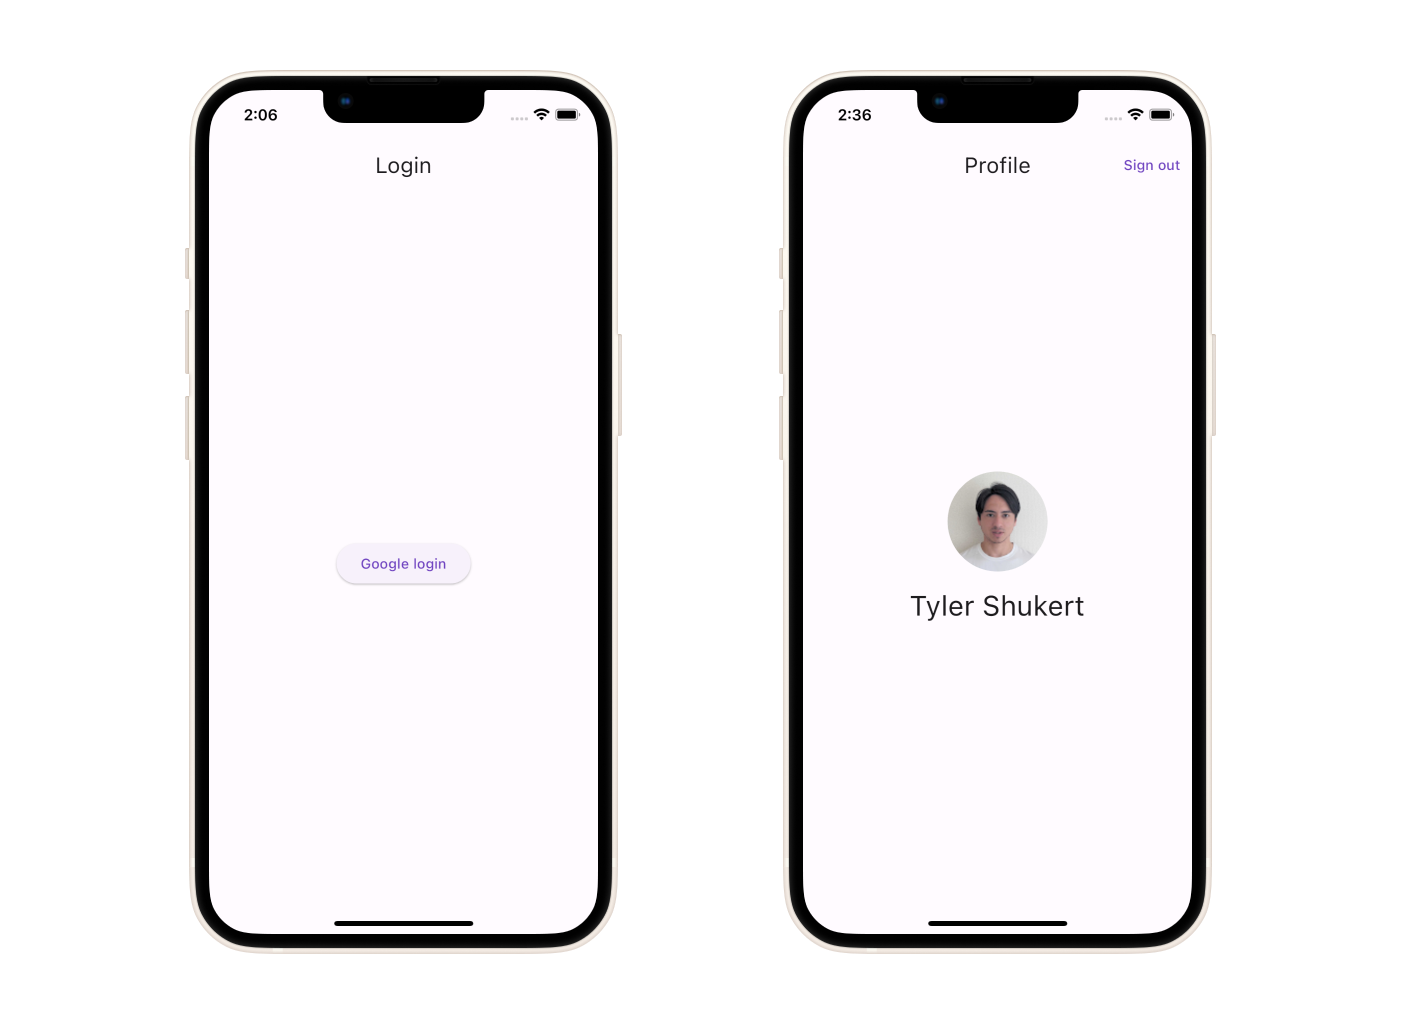
We will build a simple app with a login screen and a home screen. The user is first presented with the login screen, and only after they sign in, can they proceed to the home screen. The login screen presents a login button that will kick off a third-party authentication flow to complete the sign-in. The profile screen displays user information such as the profile image or their full name.
Setup the Flutter project
Let’s start by creating a fresh Flutter project.
_10flutter create myauthapp
then we can install the dependencies. Change the working directory to the newly created app directory and run the following command to install our dependencies.
_10flutter pub add supabase_flutter google_sign_in
The supabase_flutter package is used to interact with a Supabase instance. The google_sign_in package is used to implement social sign-in with Google.
We are done installing our dependencies. Let’s set up authentication now.
Configure Google sign-in on Supabase Auth
We will obtain client IDs for iOS, Android, and web from the Google Cloud console, and register them to our Supabase project. The web client ID will be used by the auth server of Supabase to verify the ID token provided by the Google sign-in package.
First, create your Google Cloud project here if you do not have one yet. Within your Google Cloud project, follow the Get an OAuth client ID for the iOS guide, Configure a Google API Console project for Android guide, and Get your backend server's OAuth 2.0 client ID to obtain client IDs for iOS, Android, and web respectively.
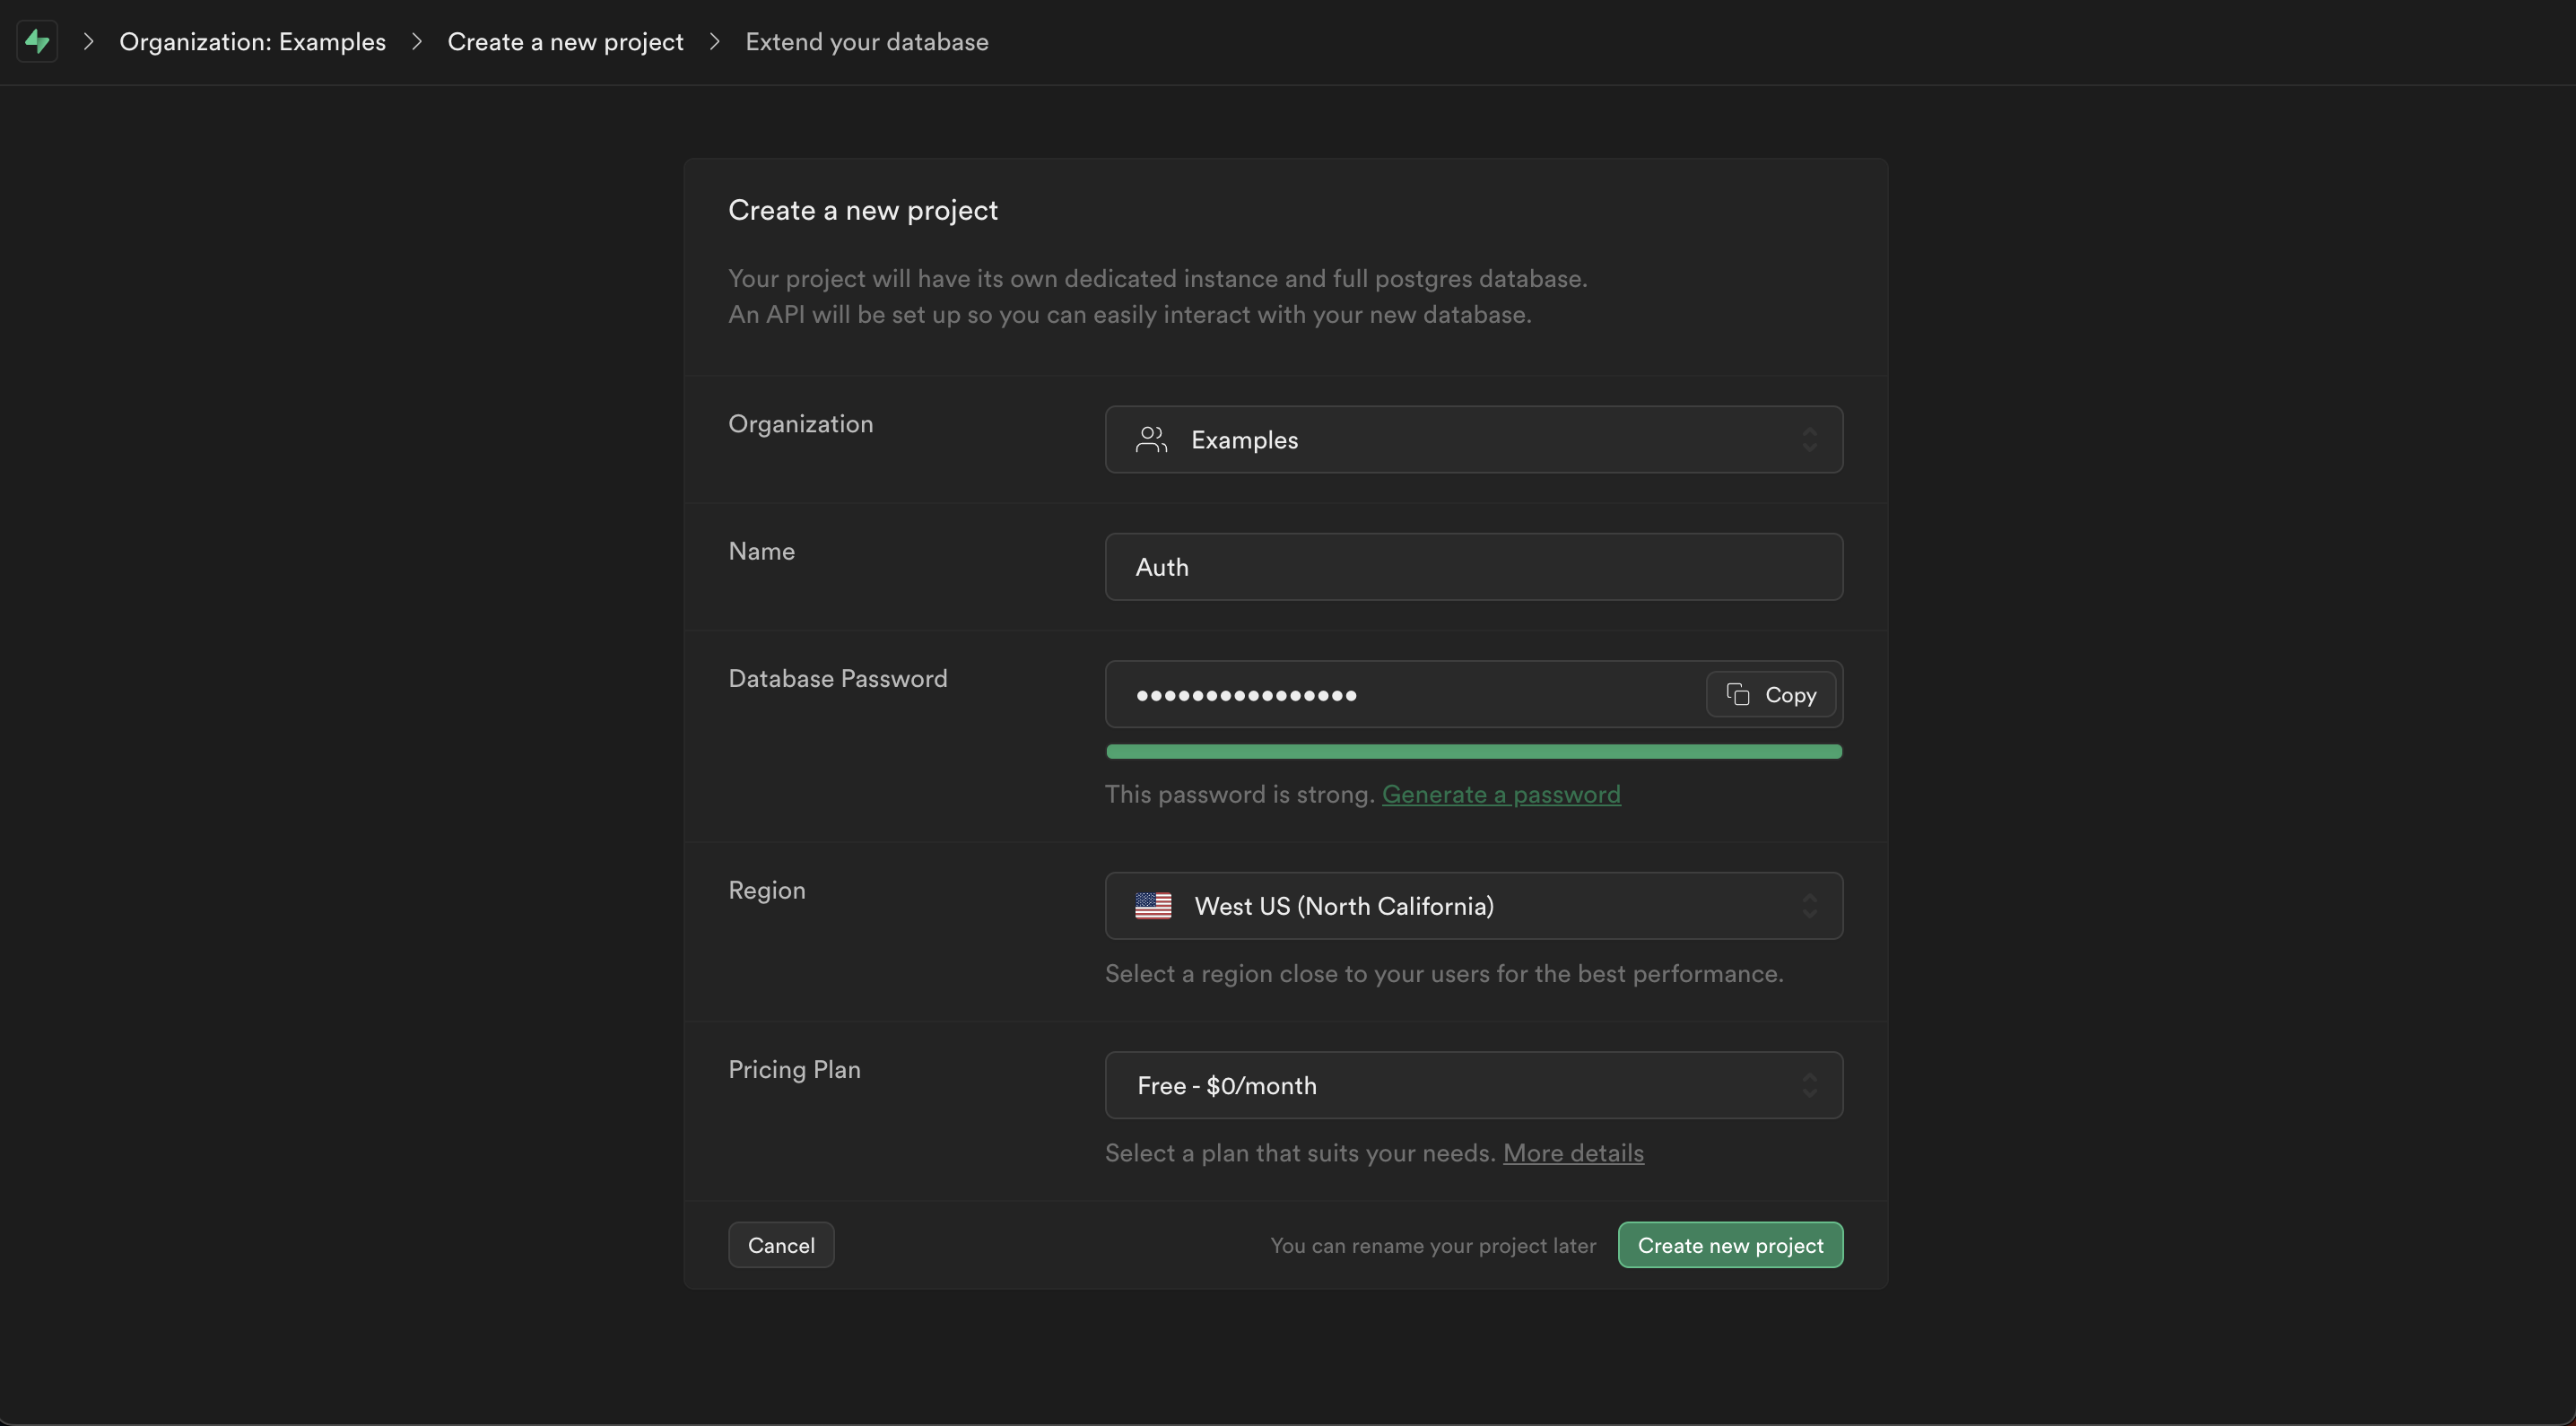
Once you have the client IDs, let’s add them to our Supabase dashboard. If you don’t have a Supabase project created yet, you can create one at database.new for free. The name is just an internal name, so we can call it “Auth” for now.
The database password won't be used in this example and can be reconfigured later, so press the Generate a password button and let Supabase generate a secure random password. The region should be anywhere close to where you live, or where your users live in an actual production app.
Lastly, for the pricing plan choose the free plan that allows you to connect with all major social OAuth providers and supports up to 50,000 monthly active users.
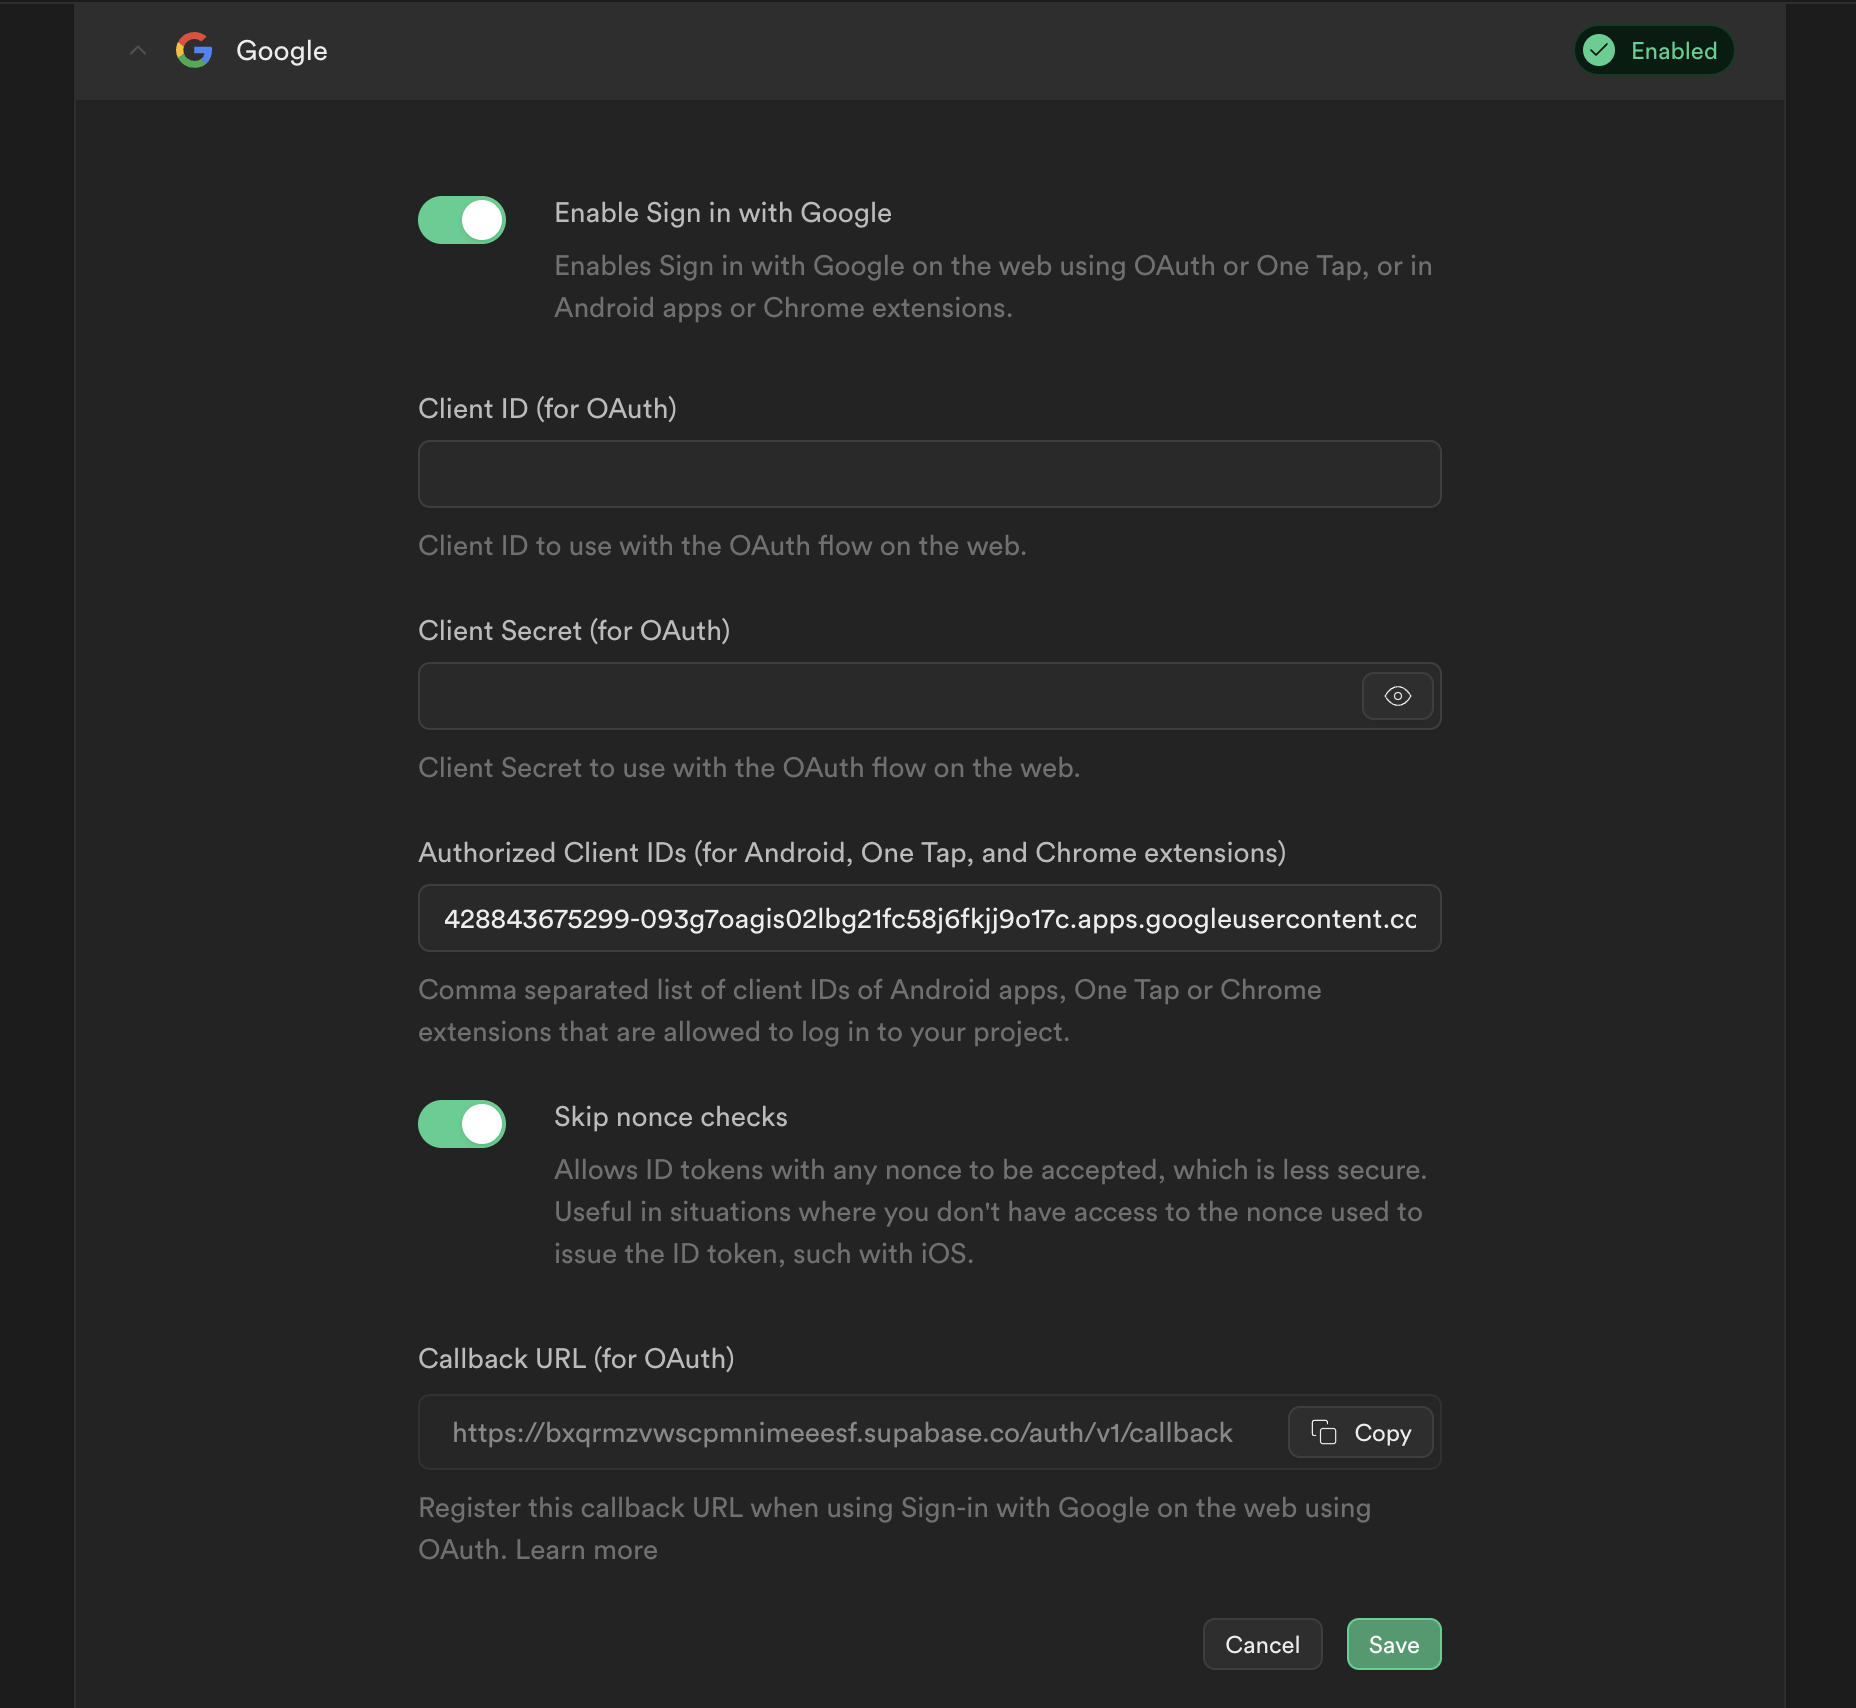
Your project should be ready in a minute or two. Once your project is ready, open authentication -> Providers -> Google to set up Google auth. Toggle the Enable Sign in with Google switch first. Then add the web client ID you obtained in your Google Cloud console to Authorized Client IDs field. No need to add the Android or iOS client IDs here.
Turn on the Skip nonce checks option. This would allow us to use the Google sign in package on iOS, which is not compatible with providing a method to access or specify a nonce.
We also need some iOS specific settings. Open ios/Runner/Info.plist file and add the CFBundleURLTypes like the following. You need to provide the reverse client ID of the iOS client ID you registered earlier.
_13<key>CFBundleURLTypes</key>_13<array>_13 <dict>_13 <key>CFBundleTypeRole</key>_13 <string>Editor</string>_13 <key>CFBundleURLSchemes</key>_13 <array>_13 <!-- TODO Replace this value: -->_13 <!-- Copied from GoogleService-Info.plist key REVERSED_CLIENT_ID -->_13 <string>com.googleusercontent.apps.my-ios</string>_13 </array>_13 </dict>_13</array>
That is it for setting up our Supabase auth to prepare for Google sign-in.
Finally, we can initialize Supabase in our Flutter application with the credentials of our Supabase instance. Update your main.dart file and add Supabase.initialize() in the main function like the following. Note that you will see some errors since the home screen is set to the LoginScreen, which we will create later.
_31import 'package:flutter/material.dart';_31import 'package:myauthapp/screens/login_screen.dart';_31import 'package:supabase_flutter/supabase_flutter.dart';_31_31void main() async {_31 /// TODO: update Supabase credentials with your own_31 await Supabase.initialize(_31 url: 'YOUR_SUPABASE_URL',_31 anonKey: 'YOUR_ANON_KEY',_31 );_31 runApp(const MyApp());_31}_31_31final supabase = Supabase.instance.client;_31_31class MyApp extends StatelessWidget {_31 const MyApp({super.key});_31_31 @override_31 Widget build(BuildContext context) {_31 return MaterialApp(_31 debugShowCheckedModeBanner: false,_31 title: 'Flutter Auth',_31 theme: ThemeData(_31 colorScheme: ColorScheme.fromSeed(seedColor: Colors.deepPurple),_31 useMaterial3: true,_31 ),_31 home: const LoginScreen(),_31 );_31 }_31}
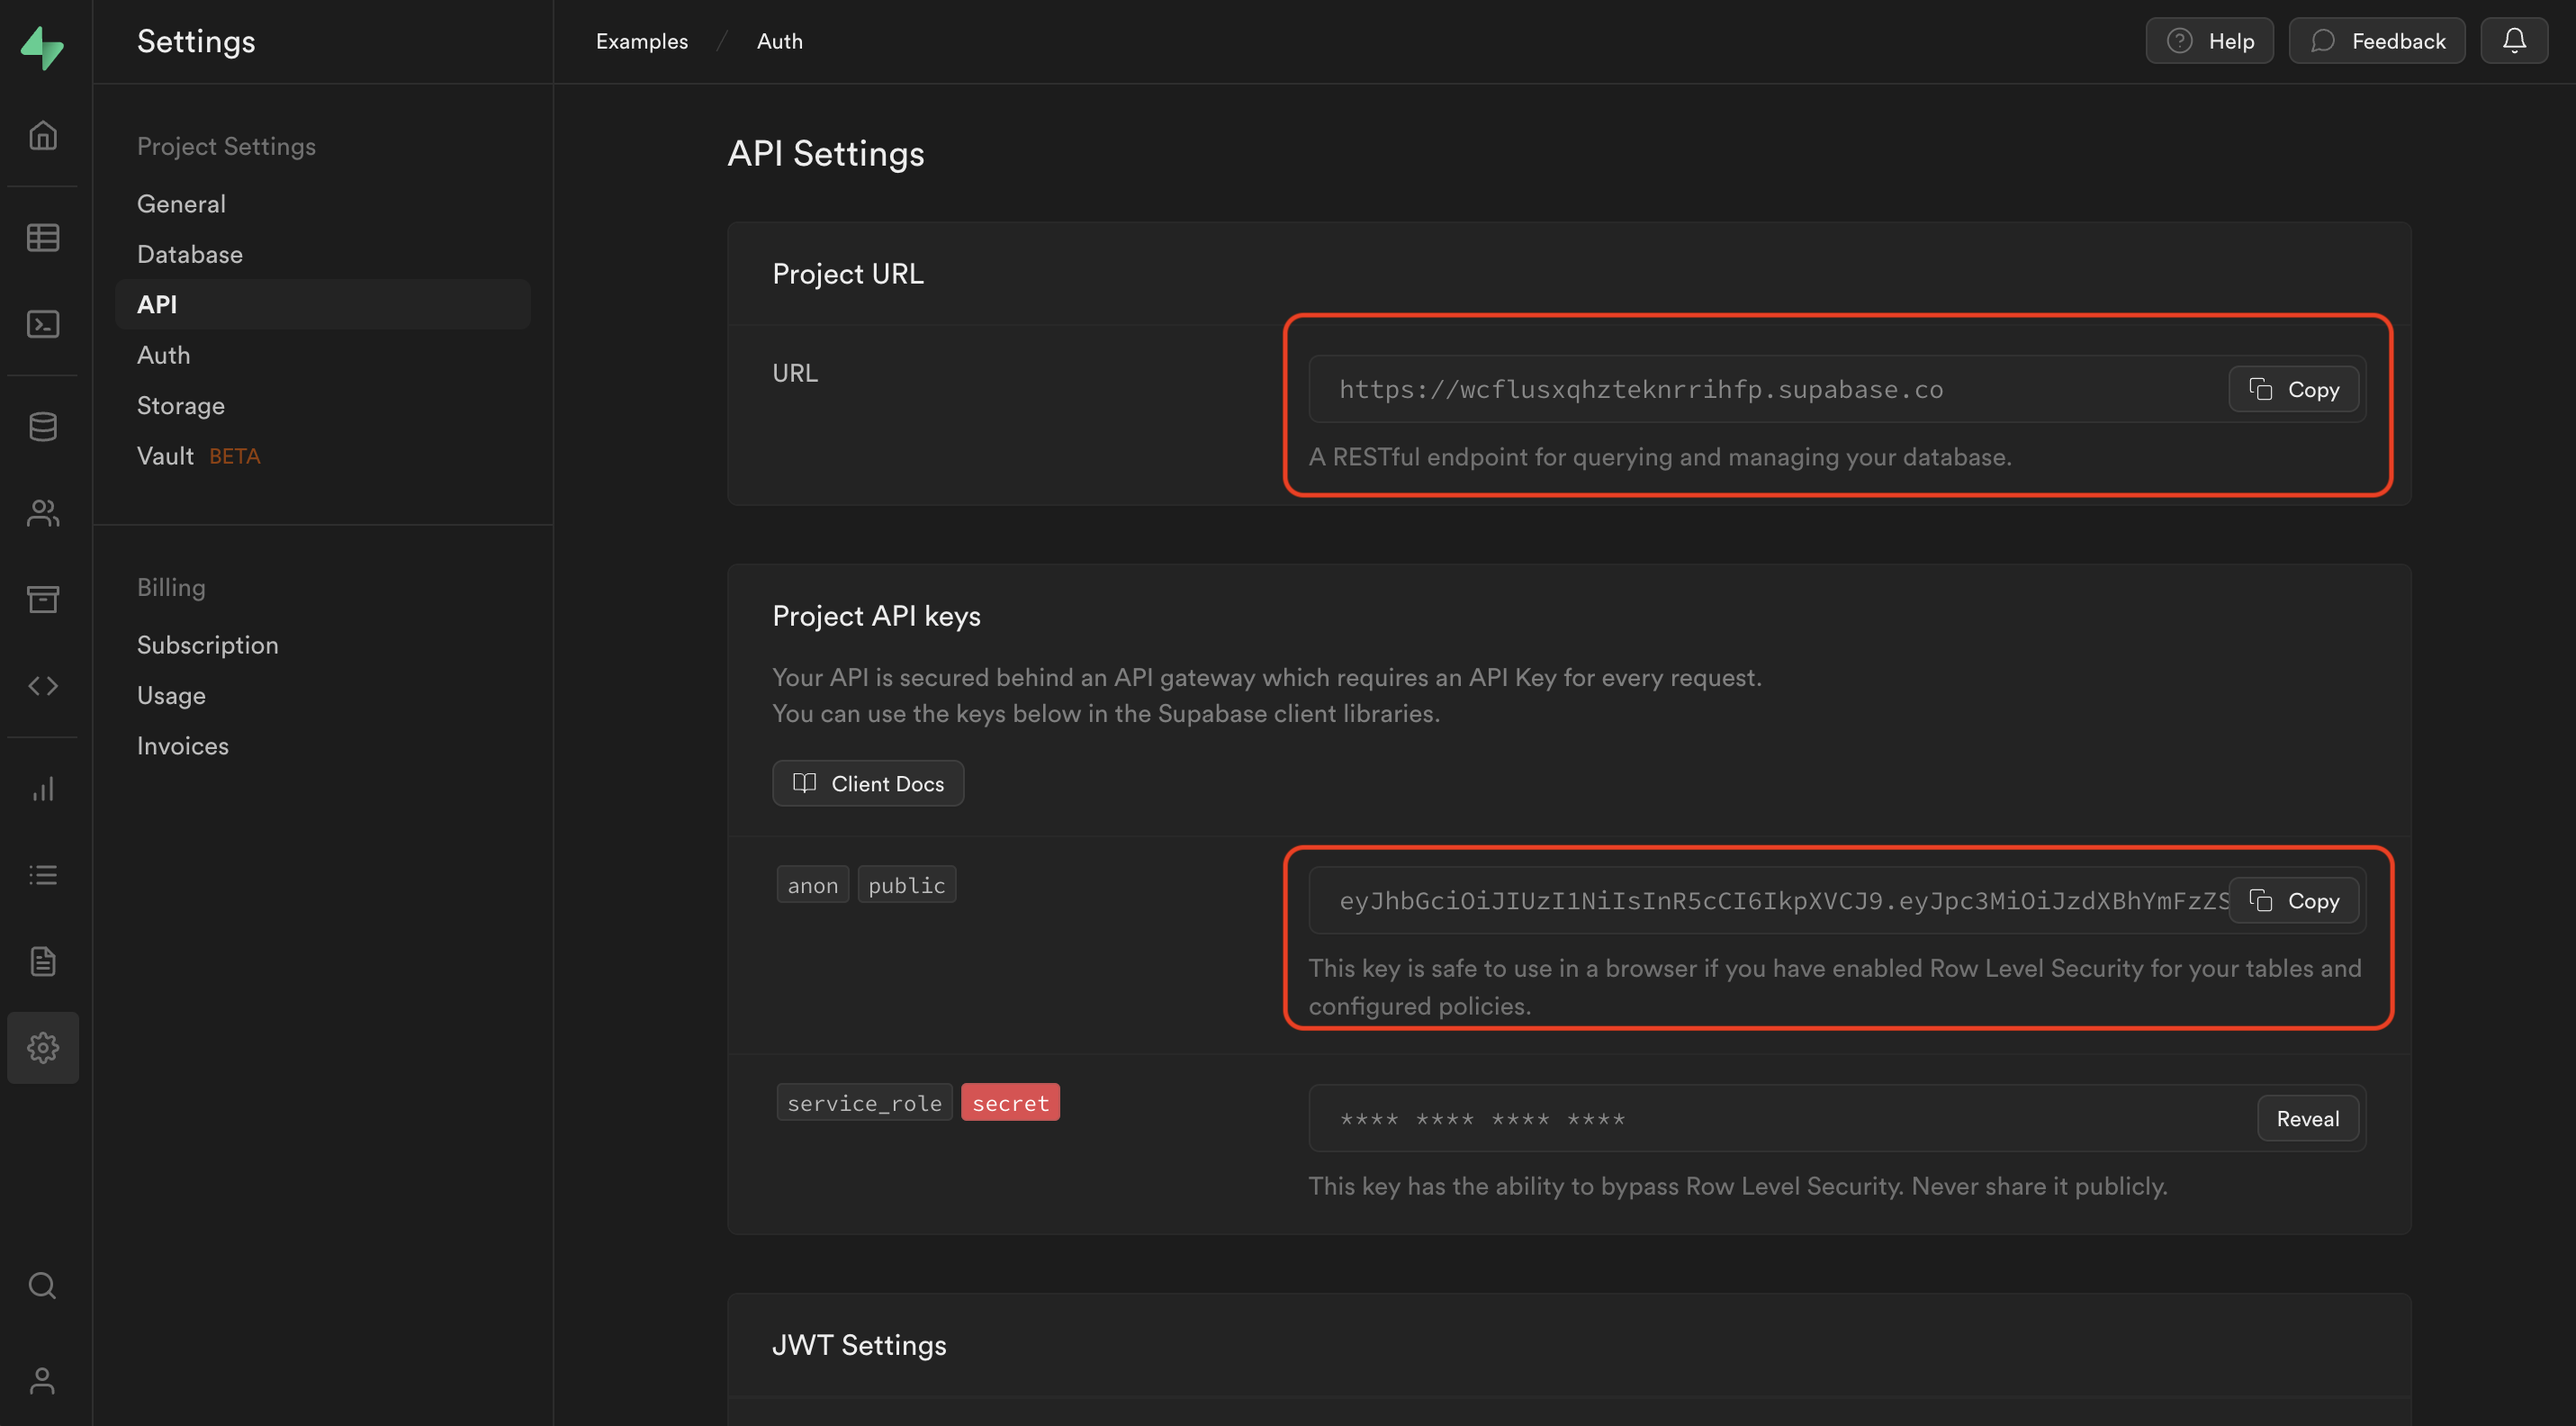
You can find your Supabase URL and Anon key in Settings -> API from your Supabase dashboard.
Create the Login Screen
We will have two screens for this app, LoginScreen and ProfileScreen. LoginScreen presents a single sign-in button for the user to perform Google sign-in. Create a lib/screens/login_screen.dart file add add the following.
_85import 'package:flutter/material.dart';_85import 'package:google_sign_in/google_sign_in.dart';_85import 'package:myauthapp/main.dart';_85import 'package:myauthapp/screens/profile_screen.dart';_85import 'package:supabase_flutter/supabase_flutter.dart';_85_85class LoginScreen extends StatefulWidget {_85 const LoginScreen({super.key});_85_85 @override_85 State<LoginScreen> createState() => _LoginScreenState();_85}_85_85class _LoginScreenState extends State<LoginScreen> {_85 @override_85 void initState() {_85 _setupAuthListener();_85 super.initState();_85 }_85_85 void _setupAuthListener() {_85 supabase.auth.onAuthStateChange.listen((data) {_85 final event = data.event;_85 if (event == AuthChangeEvent.signedIn) {_85 Navigator.of(context).pushReplacement(_85 MaterialPageRoute(_85 builder: (context) => const ProfileScreen(),_85 ),_85 );_85 }_85 });_85 }_85_85 Future<AuthResponse> _googleSignIn() async {_85 /// TODO: update the Web client ID with your own._85 ///_85 /// Web Client ID that you registered with Google Cloud._85 const webClientId = 'my-web.apps.googleusercontent.com';_85_85 /// TODO: update the iOS client ID with your own._85 ///_85 /// iOS Client ID that you registered with Google Cloud._85 const iosClientId = 'my-ios.apps.googleusercontent.com';_85_85 // Google sign in on Android will work without providing the Android_85 // Client ID registered on Google Cloud._85_85 final GoogleSignIn googleSignIn = GoogleSignIn(_85 clientId: iosClientId,_85 serverClientId: webClientId,_85 );_85 final googleUser = await googleSignIn.signIn();_85 final googleAuth = await googleUser!.authentication;_85 final accessToken = googleAuth.accessToken;_85 final idToken = googleAuth.idToken;_85_85 if (accessToken == null) {_85 throw 'No Access Token found.';_85 }_85 if (idToken == null) {_85 throw 'No ID Token found.';_85 }_85_85 return supabase.auth.signInWithIdToken(_85 provider: OAuthProvider.google,_85 idToken: idToken,_85 accessToken: accessToken,_85 );_85 }_85_85 @override_85 Widget build(BuildContext context) {_85 return Scaffold(_85 appBar: AppBar(_85 title: const Text('Login'),_85 ),_85 body: Center(_85 child: ElevatedButton(_85 onPressed: _googleSignIn,_85 child: const Text('Google login'),_85 ),_85 ),_85 );_85 }_85}
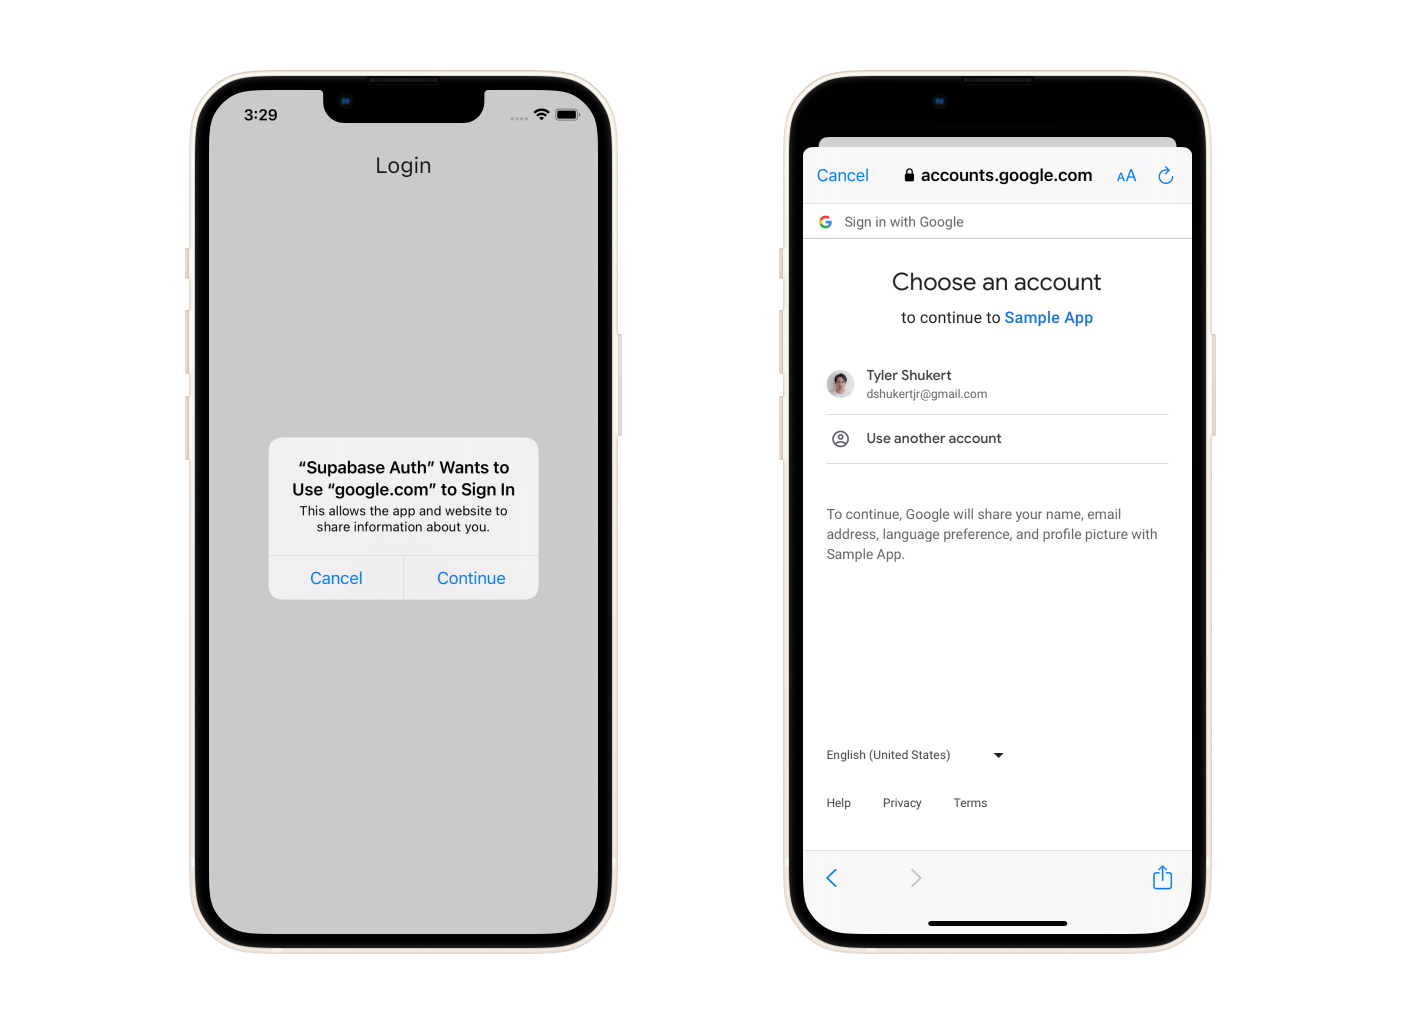
In terms of UI, this page is very simple, it just has a basic Scaffold with an AppBar, and has a button right in the middle of the body. Upon pressing the button, Google sign in flow starts. The user is presented with a Google authentication screen where they will complete the consent to allow our application to sign the user in using a Google account, as well as allow us to view some personal information.
Within the onPressed callback of the button, we are calling the _googleSignIn method.
This method calls the Google sign-in package to perform the sign-in flow.
Once the user completes the sign-in flow, we obtain an access token and an ID token.
We will pass these tokens to Supabase auth to then obtain a Supabase session.
Create the Profile Screen
The ProfileScreen will be just a simple UI presenting some of the information we obtained in the LoginPage. We can access the user data with supabase.auth.currentUser, where Supabase has saved the personal information in a property called userMetadata. In this example, we are displaying the avatar_url and full_name to display a basic profile page. Create a lib/screens/profile_screen.dart file and add the following.
_54import 'package:flutter/material.dart';_54import 'package:myauthapp/main.dart';_54import 'package:myauthapp/screens/login_screen.dart';_54_54class ProfileScreen extends StatelessWidget {_54 const ProfileScreen({super.key});_54_54 @override_54 Widget build(BuildContext context) {_54 final user = supabase.auth.currentUser;_54 final profileImageUrl = user?.userMetadata?['avatar_url'];_54 final fullName = user?.userMetadata?['full_name'];_54 return Scaffold(_54 appBar: AppBar(_54 title: const Text('Profile'),_54 actions: [_54 TextButton(_54 onPressed: () async {_54 await supabase.auth.signOut();_54 if (context.mounted) {_54 Navigator.of(context).pushReplacement(_54 MaterialPageRoute(builder: (context) => const LoginScreen()),_54 );_54 }_54 },_54 child: const Text('Sign out'),_54 )_54 ],_54 ),_54 body: Center(_54 child: Column(_54 mainAxisSize: MainAxisSize.min,_54 children: [_54 if (profileImageUrl != null)_54 ClipOval(_54 child: Image.network(_54 profileImageUrl,_54 width: 100,_54 height: 100,_54 fit: BoxFit.cover,_54 ),_54 ),_54 const SizedBox(height: 16),_54 Text(_54 fullName ?? '',_54 style: Theme.of(context).textTheme.headlineMedium,_54 ),_54 const SizedBox(height: 32),_54 ],_54 ),_54 ),_54 );_54 }_54}
And with that, we now have a basic working personalized application that utilizes Google sign-in.
Conclusion
In this post, we learned how to implement authentication in a Flutter application using Google sign-in and the Supabase SDK for Flutter. We also delved into the Open ID Connect functionality, which allows third-party sign-ins and the retrieval of personal information through identity tokens.
You can also check out the Flutter reference documents to see how you can use supabase-flutter to implement a Postgres database, Storage, Realtime, and more.